I’m sure this is already out there somewhere on the www, but I figured I’d include it here anyway, because it’s a trick I use fairly often.
The High Pass Sharpen
I like details. Who doesn’t? I also happen to like shooting with a wide aperture. (Newer photographers, remember that means small numbers, like 1.4, 1.8, 2.0) Unfortunately, shooting at such a wide aperture means sometimes I lose sharpness in the details. (I use a 50mm 1.4 but sometimes it can get pretty soft.) So how do I fix this? I take two seconds in Photoshop and give my photo a little punch. Here’s how you can too.
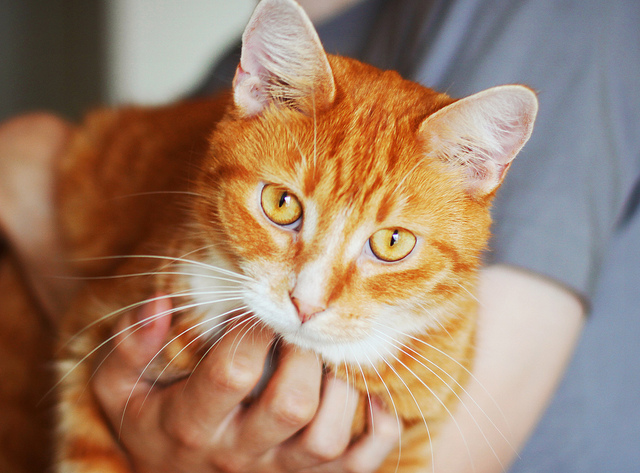
First let’s take a close up look at what your photo might look like at it’s original size. Pretty good, but could be sharper. I want Pumpkin’s eyes to be the focus, and to really pop, so that’s what I’ll sharpen. Make sure all your other editing is done (if any) and flatten your image. Now duplicate that layer. (Or if you’re a keyboard junkie like me: Ctrl + A, Ctrl + C, Ctrl + V)

Next we’re going to use the high pass. Filter → Other → High Pass. Up pops a screen asking you to input the radius number. This is really up to you, because every image will be different. You don’t want it to be too much because this is really a subtle technique. For the sake of this example I used 8.8 so you could really tell the difference, which is more than double what I usually use. (I vary from 2.8 – 4.8 depending on the photograph.) Next we’ll want to overlay this layer. (In your layers bar, to the left of Opacity and Fill, located in the right sidebar. By default it’s set to “Normal”.)

Now your photograph looks something like this. But, in my humble opinion, this is too much. See the fur on the top of his head? The whole photo has now obviously been attacked with a sharpen tool. Why on earth would I do that? That would defeat the purpose of shooting with a lower aperture. If I wanted his whole head in super sharp focus I would have shot with an f/stop of 2.8 or higher! I still want the majority of the photo to be soft, but I want the focus to be sharp like it would be with a nicer (read: way more expensive) lens. So what do we do?

We duplicate the background layer (your original, unsharpened photo), and place it on top of the high pass layer. Now simply take the eraser tool and wave that sucker over the main focus in the photograph. I usually do the eyes, or sometimes the eyes and nose (for cats, anyway). But for this shot I just erased the eyes, leaving me with a soft photograph, with one sharp (but subtly so) focus.

I imagine you’re getting ready to scroll back up, and then back down again to try and see if you can spot the differences. I’ll spare you the trouble.

AHA. And you thought it looked good NOW, wait until you zoom out and take the whole photo in.

PURRFECT!
Soft with that little subtle punch. (As if punches could be subtle.)
It should be noted You don’t need Photoshop to use this technique. You just need a photo editing software that uses layers, and pretty much all of them do now, and the ability to sharpen. In Paint Shop Pro you simply copy the layer and instead of doing the high pass, you sharpen till your heart is content, and then follow the same steps above!
Enjoy!


11 Comments
Cathy
16 Dec 2011 at 10:52 pmHello! Great tutorial. Just found your blog via a link to one of your hairstyle tips and found the camera tips as well!.
(Also, I got another keyboard shortcut for you: CTRL + J is the shortcut for Ctrl + A, Ctrl + C, Ctrl + V.
Ashton
14 Feb 2011 at 3:19 pmThanks Sara! I really enjoy your blog. Subjects, composition, and presentation are all very well done. -Ashton
Sara
14 Feb 2011 at 5:00 pmThank you very much, Ashton!
Kim Hinds
13 Jan 2011 at 4:10 pmthanks for the entertaining read. Very helpful, hope you post more! (no pressure) -Kim
Sara
13 Jan 2011 at 8:24 pmThanks Kim! I would love to do more tutorials, I’m just not sure what it is that people want to know! If you have any suggestions please feel free to let me know.
Hannah
29 Nov 2010 at 9:24 pmThis is a lovely tutorial! Thank you so much! I just used it on some senior pictures I’m editing and they turned out wonderfully.
endy daniel
13 Sep 2010 at 12:17 amI love this tut
Kym
5 Sep 2010 at 6:25 pmI miss Paint Shop Pro. But I use photo shop now. 😀
Kim
3 Sep 2010 at 10:47 amI love high pass filters! I use them on nearly every photo, it seems.
I find making a mask on the high pass rather than duping your original photo is easier, though – both on the clicks (minimal they may be, I’m sure you know that editing a HUGE load of photos, every click counts) and on the computer (that is, if you’re like me and can’t get on the computer without multi-tasking a million things at once. Poor computer. *pat pat*)
Sara
5 Sep 2010 at 9:50 amHuh. I never thought to do it that way, actually. I may have to try that! And I agree, when you’re editing a large amount of photos the little steps can be a big pain.
Kim
6 Sep 2010 at 4:52 pmYeah, I just click on the icon in the layers palette to add the layer mask, then paint away what I want to not be sharpened. (Or, if I’m only sharpening a small space, I ctrl+F5 to make the whole layer mask black and then paint back what I want sharp).
I love layer masks as much as I love the high pass filter. They’re a friggin’ life saver.